How are Tiny Homes built?
Its a common question that I asked myself when I first started to research the industry… how are tiny homes built? Well, it is an interesting process, and it really depends on the type of house. If it is on a trailer, please see our page “house on wheels” for detailed information on how they are built. This post will focus on the construction of a tiny home that is built on a property for the intention of being a permanent structure. Depending on the city and county, the definition of a “tiny house” may be different. I have seen anything below 250 considered a tiny house, but in other areas it is below 500 sq’. I’ve even heard of anything below 1000 sq’, so you will need to find out what is considered a tiny house. This is important as some areas have very small building fees for smaller homes and in some cases, may not require much of a permit to build.
In my personal experience, the process of building a tiny house on a piece of land does not need to be complicated. It can be nearly identical to building a larger home but with a few items that will need a little more attention. Here is a general outline for those considering to build their own house.
Zoning
Make sure your area allows houses the size of what you are wanting to build, If not, find a property elsewhere that will allow a tiny house. Do research on the website of your town, city or county and see what thier restrictions are, if any. I always place a call and get clarification with someone in a zoning department.
Plans
Once you understand the zoning requirements, design the house that fits your needs. Consult with a professional designer, draftsman and engineer to ensure that your home plans will be approved with the proper municipality. They will earn their paycheck as many designers have not done a tiny house before. It is their responsibility to take your plans thru the “Permit Approval” process. Meaning, if your city redlines or requests a revision, you will need to go back to your designer and request a revision. This may happen multiple times prior to approval. Your designer will also need to spend the time needed to review the building codes and understanding how the rules will apply to your new tiny home. As an owner/builder, I had to call our county several times to discuss my house plans and explain to them that i’m building a site built tiny house with a cement foundation, and that it will NOT have wheels. The plan reviewer that I spoke to had to ask their engineers in the office to make sure that they could even offer a permit on a really small home. So, it may take a little more time to identify what is required for your building permit.
Gathering subcontractors
If required, you may need to find a general contractor to build your home. Some area will allow an “owner build” which means that you are responsible for hiring, paying and managing your subcontractors. Either way, experts in framing, electrical, plumbing, flooring, utilities, concrete and finishes will need to be organized with bids on the way. Some contractors will require full engineered plans, others may be able to bid with a detailed design and description.
Submit for building permit
Once your design and plans are ready and complete, you will submit for a building permit. This is where the government will hit you with a variety of fees from building permit fees, flood fees, engineering review fees, impact fees and more. They often take weeks to review your plans and to make sure it is not going to sit in a flood-plane or has sub-standard construction and will meet present building codes.
Building phase 1 “The Foundation”
With a building permit in hand, it’s time to break ground. By now, your should have your underground utilities subcontractor ready to go. This may include creating a driveway, grading and building a raised and compacted pad that your home will be built on. Once this is complete, an underground utility contractor will dig and install your plumbing, electrical and water prior to concrete. Depending on the location of your utilities, they may need to trench all the way to your power pole, electrical pole, water source, septic tank and or sewer connection. This can be expensive but needs to be done correctly in order to pass inspections. Once these are complete, the pad is usually regraded and prepared for concrete. Then concrete will then be poured, leaving your utility stubs coming out above the cement line in preparation to be connected to your home. When the concrete is finished and dry, it will need to sit for a few days.
Building phase 2 “The Structure”
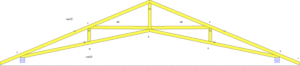
Now that the foundation is complete, it is time for your framing crew to get to work. They will start with the walls, leaving wide openings for your door and other openings for your windows. Once the walls are complete, they will install or build your trusses, including any dormers to complete the roof framing. Once the framing is complete, the process can be different but the roof, windows, doors and exterior will be completed in almost any order. Plumbing and electrical work will also progress bringing them from the concrete up the walls to where they will be later connected to fittings, switches, outlets, or where they will be connected to a toilet or shower drain. Insulation will either be blown in the roof and walls or rolled if it is batting. Exterior paint and final finishes are now completed or may wait until the contractor can paint the inside if applicable.
Windows can sometimes bring sticker shock if you are not careful. If they are dual-pane and custom sized, you will definitely pay a lot more for them. Also, if you are wanting them to open, up goes the price again. The average tiny home probably averages 1 window for every 8-10 square feet which is unheard of in larger homes. If you are building your own house, be mindful of the cost of your windows.
Building phase 3 “The Finishes”
This often starts with the walls and ceiling being covered in wood slats or shiplapping throughout the tiny house. Cabinets are installed in the kitchen and bathroom if there is room, in addition to other secondary woodwork such as stairs or steps. Countertops are then added whether it is butcher block, granite or laminate then backspash is installed. The appliances can be installed at this point and connected to both electrical, sewer and water. The kitchen sink, lights, electrical outlets are next throughout. The bathroom is very custom and takes a little time to finish, including the shower surround, toilet install, cabinet and sink, lights and switches. Lastly we have final electrical finishes and flooring. Ideally, most tiny houses have thin flooring but still may be tile, wood or laminate products. Interior paint and other finishes may be completed at this time.
Final and inspection
Once these items are complete, there is usually a final inspection called in. Most places require it to be done when electrical and plumbing is exposed in the framing. Once you pass inspections, you are cleared to connect a power and water meter to your utility connections. These will cost additionally, not including any final costs of connecting to your city sewer or septic tank.
Although there may be many details yet to be included in this “how to” post, I include most everything important in understanding how a tiny house is built. Although it is a smaller house, it follows most of the same building procedures as constructing a larger home. The average build time for a 400 sq’ home is about 4-5 weeks, pending on inspections, ground and utility work, and interior finishes. If you are building a tiny home with a “construction loan” from your bank, additional delays may occur. If you are building your home without a general contractor, I highly recommend getting all bids in writing prior to construction. If you are paying your workers in cash, DO NOT prepay them for the agreed work. They will be more committed if they are receiving payment AFTER they have completed their work.
What is a tiny house made of?
This is a common question as many are unsure because of the size and features of tiny homes. Most builders are using 2×4’s when it is a tiny home on wheels, but even some site built homes are using the same size lumber. In colder and even hotter climates, it is always recommended to use 2×6 construction paired with dual-pane windows and a minimum of R-30 insulation in the ceiling. If the home will be built on a wooden platform (vs concrete), I recommend a
minimum insulation factor of R-21 in the floor, but R-30 is preferred. Also a plastic barrier is ideal in the floor to ensure the rodents stay away from critical plumbing and electrical components. The insulation in the floor, ceiling and walls is often fiberglass batting, but if your budget permits, consider blown-in insulation. Yes it will cost more, but the R factor is much greater than fiberglass. I’ve had to do my own blown-in insulation by renting a machine at Home Depot for a day. In regards to roofing, I recommend asphalt shingles, not tile. This is a more cost-effective approach and I think asphalt shingles just look better on smaller houses. Depending on the span, the lighter asphalt shingles also allows the home to use a smaller scissor truss so there is more head-room in the loft. As mentioned earlier, I think the best looking tiny homes use real wood for the walls and ceilings. These attractive interiors are finished with pine, cedar or pallet-wood shiplapping, or even better, a variety of wood throughout. I prefer non-painted real wood walls and ceilings and think it improves the appeal of the home that larger homes do not have.
How are tiny houses heated and cooled?
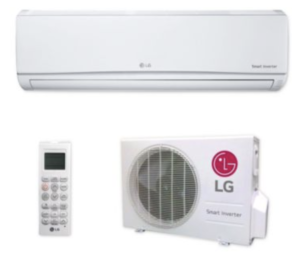
This is an important topic as there is not a one size fits all answer. I have seen cheap window units installed on tiny homes and have even central heating and cooling units installed. My favorite is the mini-split systems similar to what Pioneer or LG makes. They have a very high seer rating and are very reliable. These mini-split systems have 2 main components. First, the air handler is installed inside the house usually near the ceiling. This unit is the actual cooling system so it literally intakes warm air into the top of the unit, then pushes out cold air thru the front registers. There is no ducting at all, so no worry of “air loss” over the years. Second, the air condenser which sits just outside the house. It is responsible for pumping cool air thru the refrigerant lines that connect the 2 units. These mini-split air conditioning and heating systems can make a tiny home very comfortable in a short amount of time. It is important to note that it is not necessary to cool and heat every square inch of the home. I recommend to have air-handlers installed in the larger areas including the kitchen and bedroom. However, if the loft is large and will be used for entertainment or sleeping, it will also need to have it’s own air handler installed. So, for a 400-600 square foot home with 3 areas including a kitchen/family room, bedroom and a loft, you will need a mini-split system with 3 air handlers. But, only one air condenser will be installed outside of your home.
For those that really want to live off the land, and not add to their electric or propane bill, a wood burning stove is a great option. They can be very cheap, or very expensive depending on the system you prefer. These stoves will be able to heat the home fast, and of course only require dry wood to do their job. Wood burning stoves can take up a small amount of room, and require a flue to scale the inside wall to the roof for smoke discharge. Cooking on a basic wood stove can take a little practice with the right utensils but will generate plenty of heat to cook your favorite meal. Heavy duty stoves can heat your home for the entire night once you fill it with enough wood. The capacity of the stove will determine it’s ability to heat the entire volume of your home in extreme temperatures. Keep that in mind when you purchase your stove. Also, make sure the flue is installed properly to ensure you don’t fill your home with smoke.
The construction process can be very similar to a larger home, but noted are a few exceptions. First, the may not require a stem-wall but a uni-pore of concrete might suffice most of the time. This can save both time and money. Second, most of us don’t drywall our tiny or small houses but rather use real wood for craftsman and authentic look. Third, central AC and heating is very rare and in my opinion a waste of money unless the attic space is really large. There are other differences including trusses, plumbing fixtures that might come from an RV and even electrical can be very simple. But, with a tiny home, you build less and pay less. They are intended to save money and help create a simple life.